
How to Change a Leaky Faucet
As a homeowner, I've experienced the frustration of the soothing sound of water turning into the incessant dripping of a leaky faucet. It's not only an annoyance but can also lead to higher water bills, unsightly water stains, and the dreaded possibility of mold growth. The good news is that you don't need to be a plumbing expert to tackle this issue. In this detailed guide, I'll take you through a step-by-step process on how I successfully changed a leaky faucet, and you can too.
Why Do Faucets Leak?
When confronted with a leaking faucet, it's crucial to grasp the underlying factors contributing to this common household issue. Faucet leaks can be attributed to a variety of reasons, each of which deserves a closer examination:
Worn Out O-ring
One of the primary culprits behind faucet leaks is the diminutive yet indispensable O-ring. Located on the stem screw, this tiny disc plays a pivotal role in holding the faucet handle securely in place. Over time, the O-ring can wear out or become loose due to repeated use, leading to pesky leaks.
Corroded Valve Seat
A critical junction in the faucet system, the valve seat connects the faucet to the spout. Unfortunately, this crucial component isn't immune to the effects of corrosion, which can develop over an extended period. Corrosion can gradually erode the valve seat, creating an environment conducive to leaks.
Worn Out Washer
With each use of the faucet, the washer experiences significant pressure as it is pressed against the valve seat. This repetitive action, though essential for controlling water flow, can also result in the gradual deterioration of the washer. Consequently, a worn-out washer becomes susceptible to causing leaks.
Improper Installation
Even the most well-designed faucets can fall victim to leaks if not installed correctly. The washer's proper installation is paramount to prevent leaks. An incorrectly installed washer can create gaps or inconsistencies in the seal, allowing water to escape and manifesting as a leak.
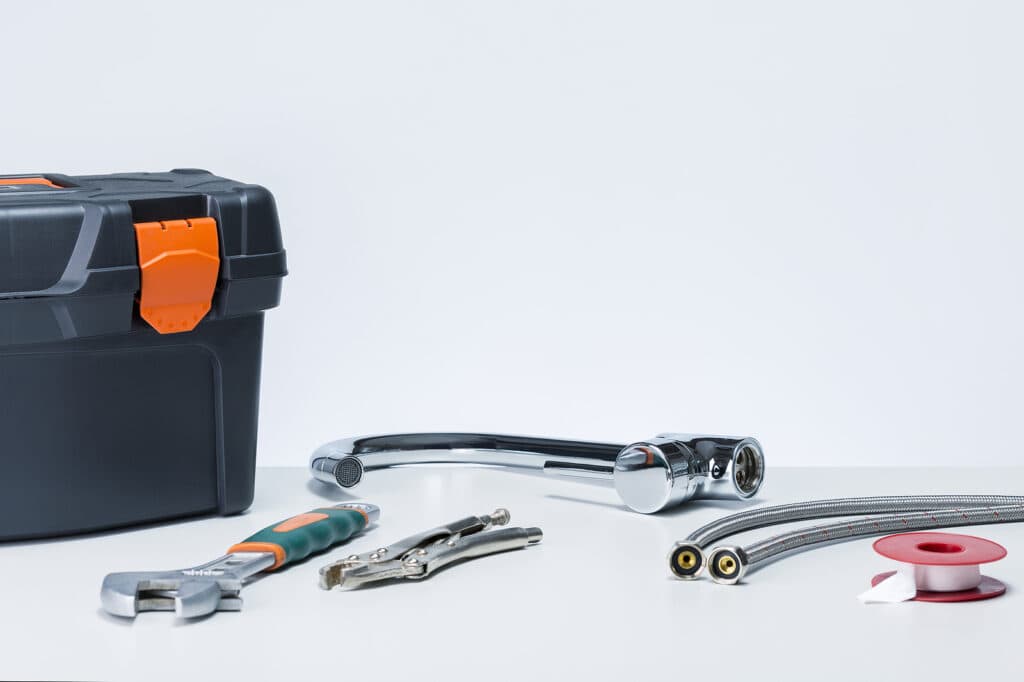
Tools You'll Need
When it comes to tackling the task of fixing a leaky faucet, it's vital to have the right tools at your disposal. A well-prepared toolkit can make the repair process more efficient and help you achieve a successful outcome. Here's a detailed list of the tools you'll need:
- Adjustable Wrench: An adjustable wrench is an indispensable tool for faucet repair. It enables you to tighten or loosen various nuts and bolts with ease, allowing for the disassembly and reassembly of faucet components.
- C-Wrench: A C-wrench, also known as a basin wrench, is specifically designed for reaching and tightening nuts that are often located in tight spaces beneath the sink. This tool is essential for loosening and securing the nuts that hold the faucet in place.
- Philips and Flat-Head Screwdrivers: These two types of screwdrivers are versatile and necessary for working on different types of faucets. Philips screwdrivers are suitable for screws with a cross-shaped recess, while flat-head screwdrivers are used for screws with a single straight-line slot.
- Replacement Parts (such as O-rings and washers): To address the root causes of faucet leaks, you'll likely need replacement parts. These can include O-rings, washers, and other components specific to your faucet model. Having the right replacement parts on hand ensures you can complete the repair without delays.
- Penetrating Oil (e.g., WD-40 or CLR): Penetrating oil is invaluable for loosening corroded or stuck faucet parts. When components have been in place for a long time, they may be challenging to remove. Applying penetrating oil helps break down rust and corrosion, making disassembly easier.
- Old Rag or Cloth: Keeping a rag or cloth handy is essential for cleaning up excess water and preventing it from seeping into your workspace. It also provides a surface for placing disassembled faucet parts to keep them organized and prevent damage.
Identifying Your Faucet Type
Before embarking on any faucet repair or replacement project, it's essential to accurately identify the type of faucet you're dealing with. Faucet types vary in design and operation, and understanding these distinctions is fundamental to the successful execution of your plumbing task. Let's delve into the details of the four primary faucet types:
Compression Faucets
Recognized by their dual handles—one for hot water and one for cold—compression faucets operate on a basic yet effective principle. When you turn the handles, they compress a rubber or neoprene washer against the valve seat. This action stops water flow by blocking the passage. Due to their design, compression faucets are more susceptible to leaks over time, typically from the washer wearing out.
Ball Faucets
Ball faucets are characterized by a single lever handle that pivots in all directions. Beneath this handle, you'll find a round, dome-shaped ball bearing with multiple openings. As you move the handle, the ball rotates and aligns with different ports within the faucet body, regulating both water flow and temperature. Ball faucets are known for their durability and ease of use.
Ceramic-Disk Faucets
Ceramic-disk faucets are recognized for their exceptional longevity and precise control over water flow and temperature. They can feature either a single lever or dual handles. Instead of rubber washers, ceramic-disk faucets employ two ceramic cylinders with tight tolerances. When the handle is turned, these ceramic disks move relative to each other, allowing for the desired water flow and temperature adjustment. These faucets are less prone to leaks and are known for their reliability.
Cartridge (Sleeve) Faucets
Cartridge faucets share similarities with ceramic disk faucets but utilize a cartridge for flow and temperature regulation. Like ceramic disk faucets, they can have either a single lever or dual handles. The cartridge contains a series of O-rings and seals, and when you turn the handle, it moves the cartridge to control water flow and temperature. Cartridge faucets are renowned for their ease of maintenance and robustness.
Step-by-Step Guide to Changing a Leaky Faucet
Tackling a leaky faucet requires a systematic approach to ensure a successful repair. Here's a detailed, step-by-step guide to changing a leaky faucet, covering various faucet types and potential issues:
Step 1: Shut Off the Water Supply
- Locate the water supply valves positioned beneath the sink. If you're unable to find them or they're absent, turn off the main water line for your entire home to ensure water flow to the faucet is completely halted.
- To release any remaining pressure in the plumbing system, turn on the faucet and allow any trapped water to drain out.
Step 2: Remove the Handle (varies by faucet type)
- Compression & Cartridge Faucets: Begin by removing the decorative cap covering the handle. A flat-head screwdriver is typically handy for this task. Once the cap is off, you'll reveal a screw beneath it. Unscrew and remove the handle from the faucet.
- Ball Faucets: Loosen the set screw securing the handle in place. Once the set screw is loose, carefully remove the handle from the faucet.
- Ceramic-Disk Faucets: Gently push the faucet handle backward to access the screw cover. Remove this cover to expose the screw underneath. Unscrew and lift off the handle.
Step 3: Identify and Fix the Problem
- Compression Faucet: Utilize a wrench to remove the packing nut. Afterward, unscrew the stem and inspect the O-ring and washer. Replace any worn-out components with new ones to address the issue.
- Ball Faucet: Remove the cap and collar with the assistance of a wrench. Loosen the faucet cam, and then remove the washer and ball. Examine these parts closely and replace any that show signs of wear and tear.
- Cartridge Faucet: Start by removing the retaining clip. Then, pull the cartridge up so that it stands upright. If the cartridge is worn out, it's essential to replace it with a new one.
- Ceramic-Disk Faucet: Push the faucet handle back to access the escutcheon cap. Remove this cap and proceed to unscrew and remove the disk cylinder. Inspect the neoprene seals, and if they're worn out, replace them. Additionally, check the cylinder openings for any clogs and clean them as necessary.
Step 4: Reassemble the Faucet
After replacing the problematic components with new ones, reassemble the faucet in the reverse order of disassembly. This typically involves carefully following the steps outlined earlier but in reverse, ensuring everything is securely fastened and aligned.

Tips to Prevent Future Leaks
To safeguard your plumbing and ensure a leak-free faucet in the long run, it's essential to adopt a proactive approach. These detailed tips will assist you in preventing future leaks:
Regularly Check for Signs of Wear and Tear
Make it a habit to conduct periodic inspections of your faucets. Look for telltale signs of wear and tear, such as visible corrosion, loose handles, or dripping water. Identifying issues early allows you to address them promptly before they worsen and lead to leaks.
Install High-Quality Washers and O-Rings
When replacing or maintaining your faucet components, prioritize the use of high-quality washers and O-rings. These small yet critical components create watertight seals, preventing leaks at key junctions within the faucet. Opting for durable materials ensures longevity and reduces the likelihood of premature failure.
Clean Your Faucet to Prevent Mineral Deposits
Over time, mineral deposits from hard water can accumulate on faucet components, leading to decreased functionality and potential leaks. Regularly clean your faucet with a solution of equal parts vinegar and water to dissolve mineral buildup. Pay attention to the aerator, spout, and handles. Routine cleaning not only maintains the faucet's performance but also prolongs its lifespan.
Address Slow Drips and Leaks Promptly
Don't ignore even the slightest hint of a drip or leak. Whether it's a slow drip or a minor seepage, these issues can worsen over time and cause significant water wastage. Promptly investigate and rectify the source of the problem to prevent further damage and conserve water resources.
Moderate Water Pressure
Excessive water pressure can strain your faucet's components, potentially leading to leaks. Consider installing a pressure regulator if your water pressure is consistently high. This device will help maintain a safe and consistent pressure level throughout your plumbing system, reducing the risk of leaks.
Schedule Regular Plumbing Maintenance
Enlist the services of a professional plumber for periodic plumbing system inspections and maintenance. An expert can identify potential issues, such as hidden leaks or deteriorating components, that may not be evident during routine checks.
Educate Household Members
Ensure that everyone in your household is aware of proper faucet usage. Teach them to turn handles gently and avoid excessive force, which can accelerate wear and tear.
When to Call a Professional
While DIY faucet repairs can be effective for many common issues, there are instances when it's prudent to engage the expertise of a professional plumber. Here, we'll explore in greater detail the situations in which it's advisable to call upon a professional:
Persistent Leaks Despite Part Replacement
If you've diligently replaced components like washers, O-rings, or cartridges in your faucet but the leak persists, it's an indicator that there might be an underlying problem that requires professional assessment. A skilled plumber possesses the experience and tools to diagnose and address complex issues that might elude standard DIY fixes.
Complex or Unfamiliar Faucet Types
Some faucet designs are intricate and require specialized knowledge for repair. If you're dealing with an uncommon or complex faucet type, such as a high-tech electronic faucet, a professional plumber is better equipped to handle the intricacies of the system.
Suspected Pipe or Water Pressure Problems
Faucet leaks can sometimes be symptomatic of more extensive plumbing issues, such as damaged or deteriorating pipes. Additionally, irregular water pressure can contribute to faucet leaks and other plumbing concerns. A professional plumber can conduct a thorough assessment of your plumbing system to identify and address these underlying problems, ensuring a comprehensive solution.
Old or Antique Fixtures
Antique or vintage faucets may pose unique challenges due to their age and limited availability of replacement parts. A professional plumber can offer insights into preserving the historical value of these fixtures while ensuring their functionality.
Ensuring Compliance with Local Codes
Plumbing work often requires adherence to local building codes and regulations. A professional plumber is well-versed in these requirements and can ensure that any repairs or installations meet the necessary standards, preventing potential issues down the line.
Time and Convenience Considerations:
Complex faucet repairs can be time-consuming, particularly if you're not experienced in plumbing. Hiring a professional allows you to save valuable time and avoid the inconvenience of an extended repair process.
Preventative Maintenance and Inspection
Plumbing professionals offer services beyond just fixing leaks. Regular maintenance and inspections conducted by a plumber can help identify potential problems before they become major issues, ultimately saving you money in the long run.
Frequently Asked Questions (FAQs) for Fixing a Leaky Faucet
1. Why is my faucet leaking?
Faucet leaks can occur for several reasons, including a worn-out O-ring, corroded valve seat, a worn-out washer, or improper installation. Identifying the specific cause is crucial for effective repair.
2. Can I fix a leaky faucet myself?
Yes, you can fix a leaky faucet yourself if you have the necessary tools and follow the proper steps outlined in the guide. Many faucet repairs are DIY-friendly.
3. What tools do I need to fix a leaky faucet?
You will need tools such as an adjustable wrench, C-wrench (basin wrench), Philips and flat-head screwdrivers, replacement parts (O-rings, washers), penetrating oil, and an old rag or cloth. Having these tools on hand makes the repair process more efficient.
4. How do I identify my faucet type?
The guide provides details on identifying the four primary faucet types: compression faucets, ball faucets, ceramic-disk faucets, and cartridge (sleeve) faucets. Look for distinctive features and handles to determine your faucet type.
5. What should I do if the faucet handle won't come off?
If the faucet handle is stuck, try using penetrating oil to loosen it. Allow the oil to penetrate for some time before attempting to remove the handle again. If it remains stuck, consult a professional plumber.
6. How often should I check my faucets for leaks?
Regularly inspect your faucets for signs of wear and tear, dripping water, or corrosion. Conduct visual checks periodically and address any issues promptly to prevent leaks from worsening.
7. What can I do to prevent future faucet leaks?
To prevent future faucet leaks, use high-quality replacement parts, clean your faucet to remove mineral deposits, address slow drips promptly, moderate water pressure, schedule regular plumbing maintenance, and educate household members on proper faucet usage.
8. When should I call a professional plumber for faucet repair?
Consider calling a professional plumber if you have persistent leaks despite part replacement, if you're dealing with complex or unfamiliar faucet types, suspect pipe or water pressure problems, have old or antique fixtures, or need to ensure compliance with local building codes. Plumbers can also assist with preventative maintenance and inspections.
9. Is faucet repair a time-consuming process?
The time required for faucet repair can vary depending on the complexity of the issue and your experience level. Simple repairs may take less time, while complex problems may require more effort. Hiring a professional plumber can save you time and ensure a quicker resolution.
10. Why is it important to fix a leaky faucet promptly?
Fixing a leaky faucet promptly is essential to prevent water wastage, higher water bills, and potential damage to your home. Even minor leaks can escalate into more significant problems if left unaddressed, such as mold growth or structural damage.
Conclusion
In my journey as a homeowner, I've come to realize that fixing a leaky faucet is not just about silencing an annoying drip; it's about taking charge of your home's plumbing and ensuring its well-being.
Armed with the knowledge and tools provided in this guide, I've successfully tackled faucet leaks and believe that with a bit of patience, anyone can do the same. Understanding the root causes of leaks, identifying faucet types, and adopting a proactive approach to maintenance are key to preventing future issues and extending the lifespan of your faucets.
However, it's crucial to recognize when professional assistance is needed, especially in cases of persistent leaks or complex faucet types. Ultimately, the journey of faucet repair is not just about convenience; it's about the satisfaction of maintaining your home, one drip at a time.
Sources